Hey there, random stranger!
Welcome to my personal student website.
My name is Tomek Prabucki.
I am first year Computer Science student at Coventry University, UK.
Below I'll present my work on Activity-Led Learning projects. Therefore, if you're not interested in those kinds of things, I strongly advise you pressing CTRL+W on your keyboard. Consider yourself warned ;)
As for me - I am a young Polish computer enthusiast, who just recently moved into UK. For that reason, please excuse me any language mistakes I might make. Apart from that, I am a Linux lover, occasionally enjoying video-editing and graphic projects, but above all - I am a programmer and a geek.
Allright, enough about myself.
Scroll down to see my university projects.
I hope you enjoy them :)
Times flies fast, and just after 4 months at university we began working on our second project.
The concept behind it is to create a GUI program preferably coded in Python.
Whole project is supposed to be maintained within GitHub repository.
The official, university name for the project is "Virtual Robot Bargain Hunt" or just "VRBH".
Our GUI program should display a visual representation of a robot searching through a database of items
in order to find the best bargains. Awesome!
Note: Below I'm presenting my final production video.
If you don't want to spoil the final effect, you can skip it to my week-by-week development blog.
However, over time we've made tons of various changes and rejected multiple ideas that turned out to be a garbage.
To make the whole content more clear I removed some of them and edited the whole thing afterwards. Hope you don't mind ;)
Week 1
INTRODUCTION
Today we were introduced to our teams. I had a pleasure of meeting my 4 teammates, whose names I unfortunately cannot write here. Needless to say, they all seem to be a bunch of cool folks. As a part of ALL session we all wrote our skills and weaknesses, to have a better understanding of our human resources.
Having 94% from previous university project and being eager to work, I've been chosen by group as a team leader. This pushed me to quickly organize our project workflow, and thus, we quickly opened GitHub repository, installed clients on our laptops and began to play around with it to get a better understanding on how we will work in upcoming weeks.
We also took a look at various project management tools. We tried both Slack and Trello, but they didn't fill our needs the way we would like. After all, we ended up with Messenger as a communication channel and cloud storage Google Drive for file sharing. This allow us to work independently in our houses and just share with everything online. Now we can proceed to our actual project!
Week 2
PROJECT IDEA
As soon as we finished setting everything up, the time has come to came up with an idea on what are we actually going to create this semester. And so our team sat down together for a brainstorm.
As written on the first page, the university project is called "Virtual Robot Bargain Hunt". So firstly, we began to think what items would suit the best our needs - and being geeks, we came up with a perfect idea - computer parts! How about creating a PC configurator, that looks for PC components in order to find the best configuration? That sounded awesome to all of us, as PC components have many attributes that needs to fit with each other, allowing for a complex scenario for object-oriented programming For example: class components, subclass drives, subclass SSD/HDD. And for attributes: manufacturer, storage, CPU frequency, socket, etc.
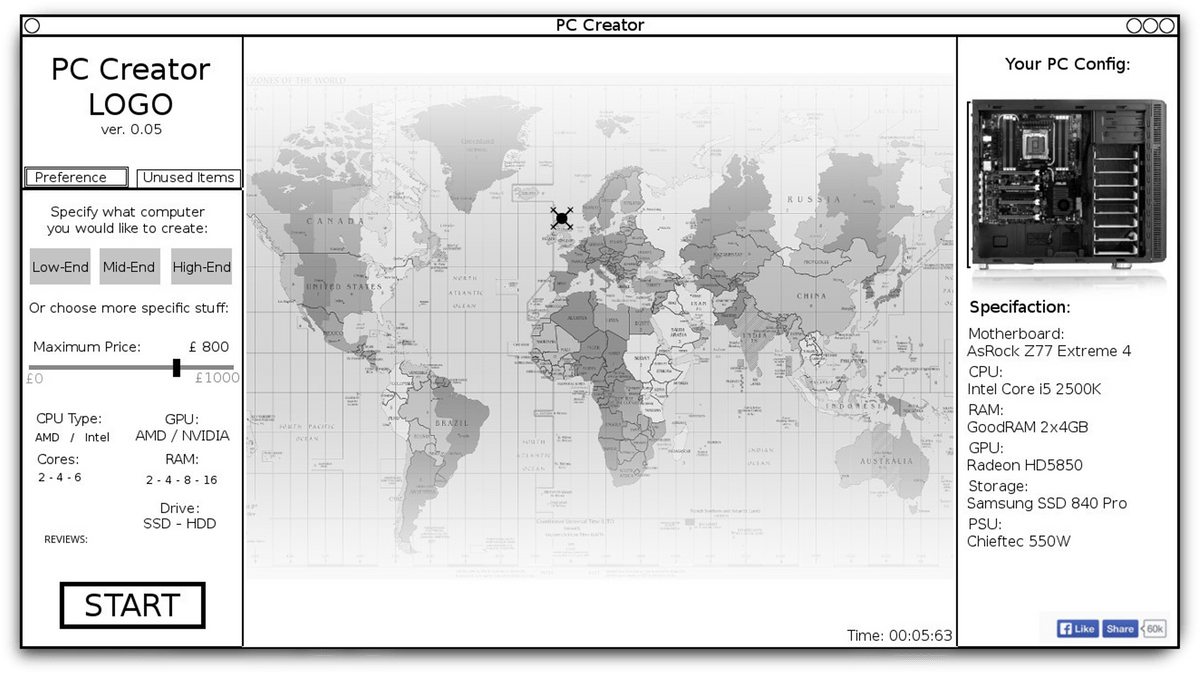
With this we made initial sketch of our application. This sketch has allowed the rest of the team to start working on coding, while the design was being finished.

Week 3
DESIGN
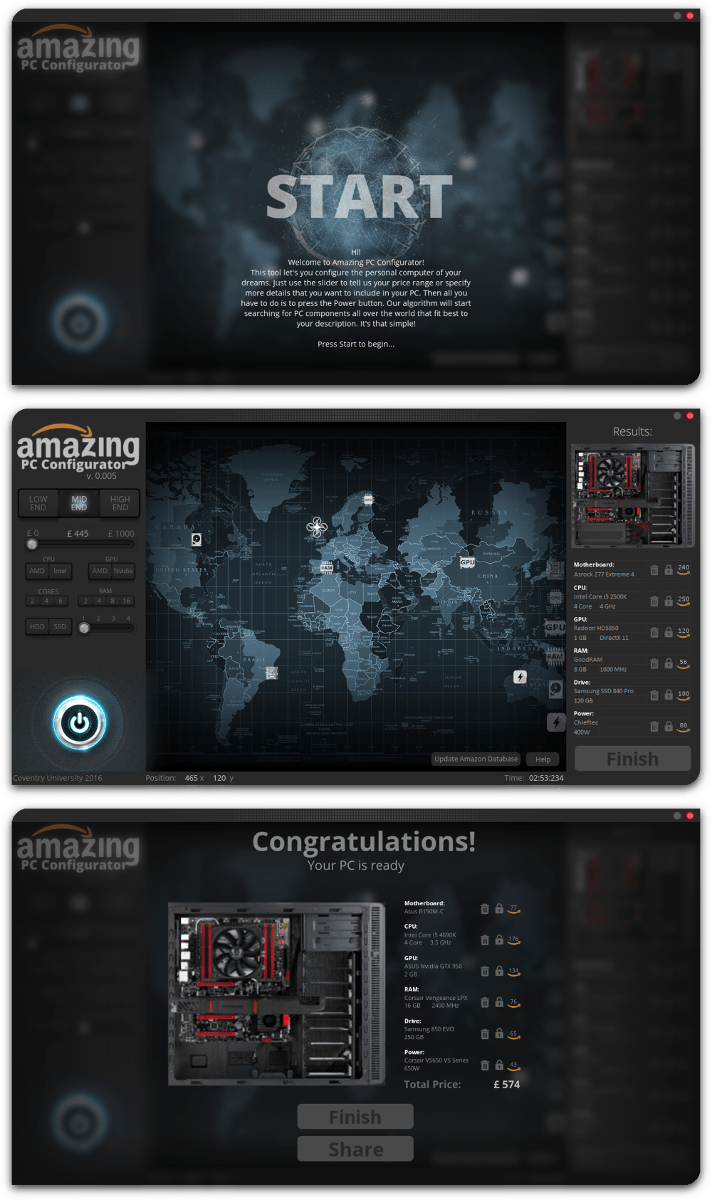
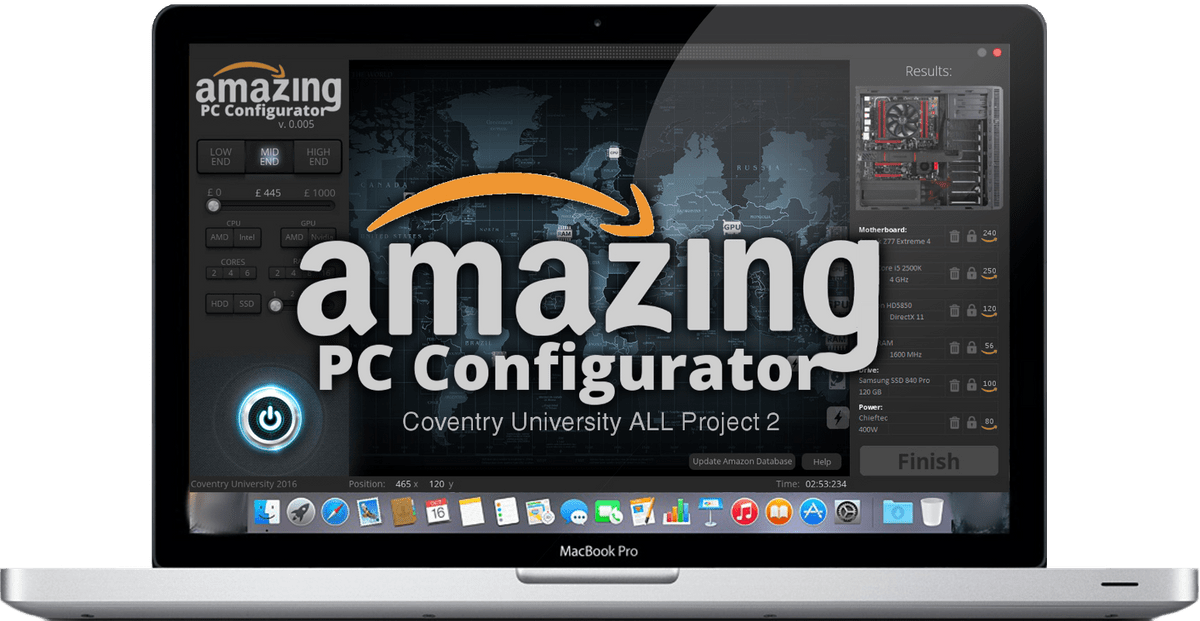
After a week spent with Adobe Photoshop, we could finally present the design of our program, visible on the left. Along with it came our program logo, that is know officially called "Amazing PC Configurator".
The logo is meant to resemble the Amazon one, with exactly the same font and orange arrow leading from A to Z. This was done on purpose, as what we eventually want to achieve is to use real PC components from Amazon store. But more on it later.
Our program begins with a Start Page. Its function is to inform the user of a program functionality and idea, since the main interface might seem to complicated, especially for less advanced users. Once a person reads the instruction, he can press the "Start" button to proceed.
The main interface allows user first to set his preferences regarding the PC of his dreams. This can be done with the menu on the left. The user can either choose one of the automatic settings, set his price range or fiddle with detailed settings such as the manufacturer of GPU/CPU or amount of storage available in HDD. Then, after pressing the power button below, the interface will turn from grey to blue, indicating active state. The main part of the interface is a world map - here we will define the initial location of our drone. After this, the map will visually show us how the drone finds and picks PC elements scattered around the world. The menu on the right displays our PC. Starting from the case, with each new element added, this view is updated with components images, eventually ending up with fully equipped PC. This allows user to see the actual progress, and understand how each element looks and where it belongs in PC case.
The design features custom title bar under Windows, which is done separately with tkinter. What we did was basically hiding the original windows one and designing our own, with our icons, look and behavior - implementing window movement. The rest of interface functionality will be explained next week along with our UML diagram.
The Final Page shows the result of our search. It displays the total price of PC allows the user to proceed to Amazon webpage in order to buy selected components. It also allows to use "share" button to recommend our app through Facebook. After clicking "Finish" the program closes.
Week 4
UML DIAGRAM
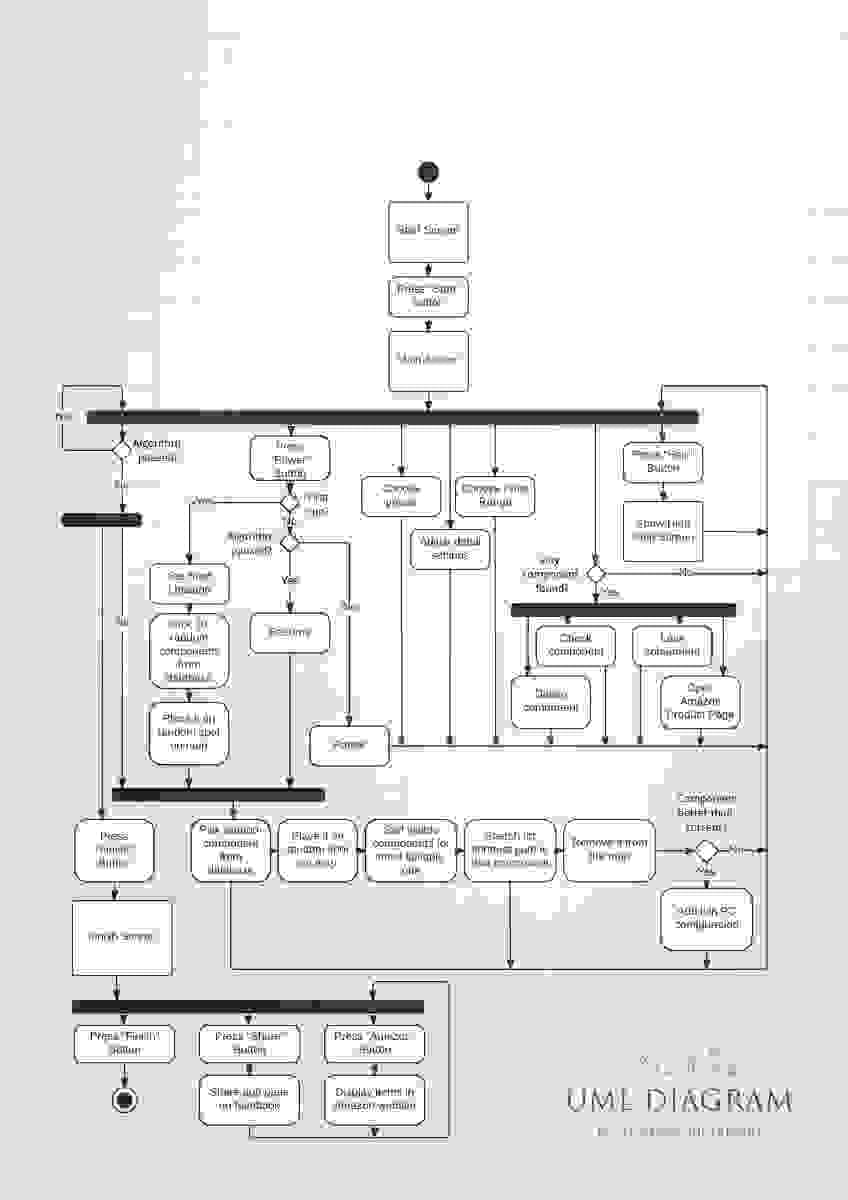
To finalize our design we created UML activity diagram, showing all the actions that are taken by user to accomplish his goal.
Since our program is created using Event-driven programming paradigm, it was hard for us to represent its behavior in this diagram. As we see on it, pressing nearly all the buttons results in activating certain action and then returning to synchronization point. To explain it - one of the most crucial parts of our program is its main loop, containing every action that is made constantly throughout the whole time of running, such as GUI update or checking whether one of events has occurred. This is also the most delicate part of code as adding more operations there results to higher CPU usage. Most of those action are hidden in the diagram, as placing them would result in diagram becoming unreadable. However, in the top-left corner we can see how the program constantly checks whether an algorithm is paused. If it isn't then it continues to search for components and also allows the user to press the "Finish" button. The result of main loop is also visible with all the buttons being available to press from first synchronization point.
The diagram was made using Lucidchart service available online.
Week 5
USABILITY TESTING
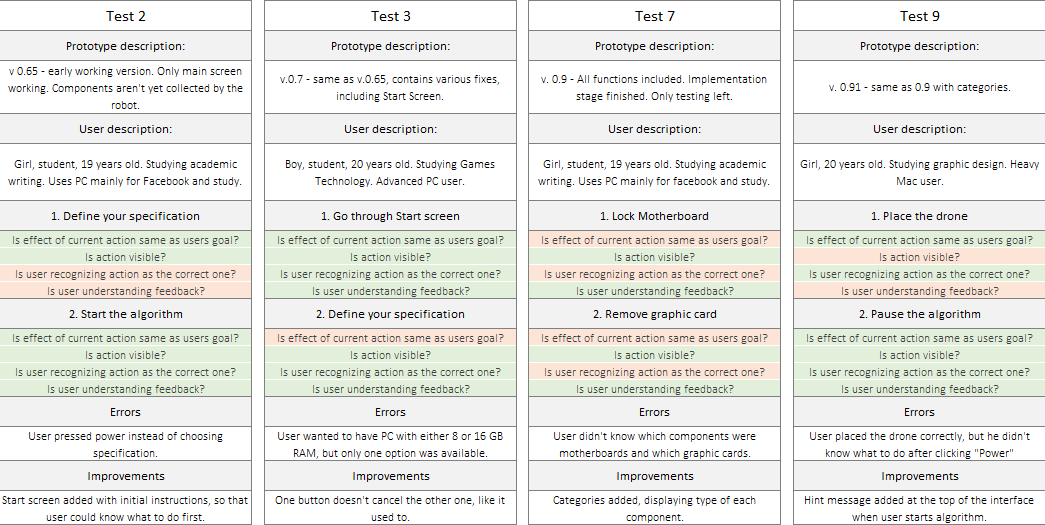
Throughout our development process I was conducting cognitive walkthroughs testing of UI to improve its usability. My flatmates agreed to fill the role of users, which turned out great since that group consist of both people who are computer experts and people who rarely use computer for activities different than Facebook. Therefore, the results of testing should show us how to improve UI to fit both of these types of people. With the help of those 4 people I conducted 12 tests total. 8 of them were positive, while the rest showed significant flaws. On the left I present those failed tests along with conclusion.
The tests show overall user satisfaction with the program. They really liked the GUI, however, 2 out of 4 of them said that the interface could be more intuitive. Steps were taken to improve this by implementing constraints and conventions listed in previous report. Additionally, Help menu was added to explain every step and option available in application. Tests 10, 11 and 12 didn’t show any flaws and users were able to use every part of program without any problems.

week 6
Individual feature
By examining university projects done by other teams, I came to conclusion that all of them, although greatly developed, are meaningless in a real world. This applied to our own team also – the university project is called „Bargain Hunt”, however all of those bargains are in fact fake, based on objects created by its creators. I decided to change that by reaching to Amazon API and replacing our fake database of PC components with real one, where every element is available in store online to buy. I believe this brings our program to a whole new level, making a tool that automatically analyses computer parts from Amazon store looking for bargains and presents us balanced configuration that is 2 clicks away from buying it.
In order to use Amazon Product Advertising API, that allows to query requests to their database, I had to sign up for their developer program, which is free for period of 12 months. This gave me my private Amazon Associate keys, required for querying requests. Each developer is able to make 1,000,000 requests per month. This might seem like a big number, but after I considered how big my database has to be and how many times I will have to run the code to check if everything is delivered as planned it suddenly becomes limiting. To avoid that problem, I restricted the number of intercepted unique components to 700 (around 100 per component type). This allows for satisfying diversity of PC configurations collected by the drone.
Another problem I encountered was that Python wrappers for Amazon API currently work only under Python 2.7. While our program is made with Python 3.5, my only possible solution was to make small separate program responsible for updating our local database under Python 2.7. This program sends requests to Amazon server to obtain 100 components of each type and write them to local SQLite database used by main program. This amount of requests caused server to throw occasional errors. This was fixed by adding slow time break
Additionally, I analysed amazon product links and discovered that such links can be created by typing ASIN number of the product into main Amazon link. This enabled me to generate buttons in main program leading directly to Amazon Product page.
week 7
testing
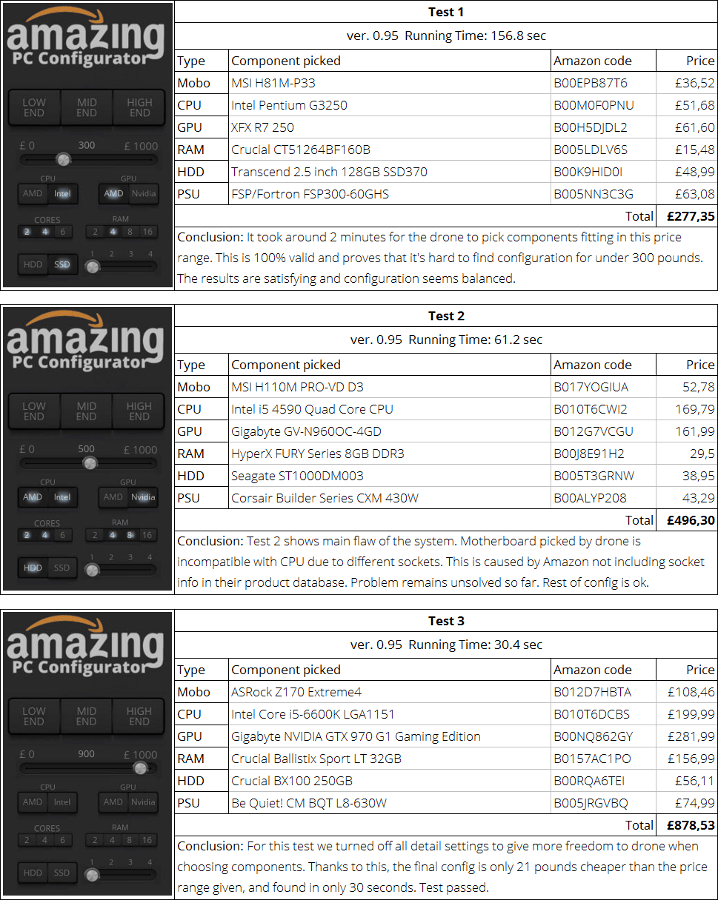
At the end of development process, I conducted series of tests to check what results are produced by the program. In other words – what PC configurations are collected by the drone in various situations. I modified the code of program, so that it saved the results to .txt file instead of just displaying them on the screen. Those results were then copied to excel spreadsheet and presented below with my personal conclusions:
Week 8
grande finale
Well, this is it... We finished all the reports, updated our blogs, collected feedback from people...
Now the only thing left are viva exams...
My reflections over this project can be found in a report below. I think I'll write couple more once I'll attend viva, receive my mark and go back to my family in Poland for holidays. For now, I'll just say it was quite a fun to work on this project. We had our better and worse moments, but after all I believe we all learned something.
Hope you enjoyed reading over this blog! If you have any questions don't hesitate to send feedback below. Thanks for stopping by ;)
Reports
Below are 3 reports regarding this project, which were required by Coventry University:
Contact ME
Well, this is it. If you have any questions, feel free to write to tom.prabucki@gmail.com


